Sunday, December 29, 2013

Seasons Greetings from the Westbay Hotel

As Google+ had gone to the trouble of adding snow to this image of the incomplete Westbay Hotel, I thought I would post it to illustrate the temperate climate of Westbay.  No matter how much it snows, it never settles.


Still plenty to do on the hotel in the new year - slating, guttering, balconies, signage and so on which I look forward to doing.  In the meantime, a very happy new year to all.


Monday, December 23, 2013

The next sleigh to arrive at platform 1 .......

I know, I know, you'd never see a sleigh in that configuration on the Cambrian Coast line but I don't care. It's my train set.


Happy Christmas!

Friday, December 6, 2013

Westbay Hotel

The diorama, Westbay, of which the halt forms part is based on Penhelyg on the Cambrian Coast line.  The line there  runs at the back of the rooftops of a row of houses but I'm aiming for a more seaside feel and decided a harbour side hotel was needed.  So this is the Westbay Hotel, unless it looks wrong, in which case it will be cast aside as something else.

I have learned the hard way that styrene walls, to which DAS has been applied with PVA, warp alarmingly without bracing and even then that it doesn't mater how much bracing I use, the styrene will still find a way to warp in some unpredictable way.  I have also learned that DAS is forgiving and will happily bend back into shape without cracking provided the warping is not too bad.  Wonderful stuff.


For the first time I have used, mostly, windows from Truetexture which are quite expensive but very good. Worth it.


Lots still to do, which suits me just fine.  This is another model I don't want to finish.  Blogging about it puts off that day!

Saturday, November 16, 2013

The Halt

The Halt is done, and very enjoyable it was too.


It will, I hope, look quite lonely - an underused attempt by an imaginary railway company to attract extra customers to an imaginary seaside resort.

Experiments with trees

I had a wish to make much better trees for future projects. Until now I have used Woodland Scenics tree trunks covered with clump foliage - fine from a distance but not a patch on some of the trees I have seen produced by other modellers.

Having looked around at a few "how to build trees" tips on numerous websites (and there is some excellent advice around) I thought I would experiment. 

One site suggested heather or sage bush so during a walk up Moel Famau I gathered a few bits of  broken off heather.  A few choice bits went into the microwave (as advised) for a few minutes, sufficient to kill any bugs or fungus but not enough to set them alight.  (The following picture is a serving suggestion only)


The bits were super glued together, roughly copying an ash tree.....


 ....followed by the addition of a few sprigs of sea moss. The joins were covered with Green Scene flexi-bark. The trunk looked a bit thin for the size of tree so that was filled out with DAS then painted with acrylics.


And a coating of Display Mount and Noch leaves to finish.


Time consuming, but I  am happy that this looks much better than earlier attempts.  Mrs Chas suggested using dried herbs instead of Noch leaves.  What a good idea!  I shall give it a go.   The next challenge is a generic conifer.

Addendum:  Geoff's comment below includes a link to one of his typically detailed master classes, this time on model trees.  It's a much better description than here!

St John's Church Lychgate

I forgot to post this close up of the hurriedly made Lychgate for the parish church diorama, set in the unfinished wall.  I have a love/hate relationship with fiddly jobs.  I love modelling detail but hate it when a bit of microstrip would rather stick to my fingers or the tweezers than to another piece of styrene.  What on earth is that about?

On closer inspection of the "timber" I can see that the surfaces are far too smooth and need to look more distressed.  Another lesson learned.


Saturday, November 9, 2013

Disused Railway Photographs

After reading a post on Geoff's blog about "Bridges for Modellers" (a book which I have now ordered) I came across this collection of photos of disused railway architecture and engineering on Flickr.  Lots of detailed photos for modellers.  Fascinating and well worth a visit.

Monday, October 28, 2013

The Halt

Since finishing the parish church I have spent the last few weeks faffing about wondering what to build next. After only a brief few years modelling I am, I'm afraid, hooked and now when I have nothing to work on I feel at a loose end.  Perversely though, I couldn't find the motivation to make anything.  Very odd.

However, after seeing a few photos of the Cambrian Coast railway and recalling a couple of very pleasant trips along the coast, I purchased my first railway DVD, a driver's eye view of the section between Machynlleth and Barmouth.  I am concerned, by the way, that this is the start of a steep descent into the crepuscular world of rivet counting from which there is no return.  Anyway, every few seconds brought a captivating scene which I would have loved to try to model, so I am going to have a go at a short section of an imaginary line and have started on a station halt with a wooden platform.

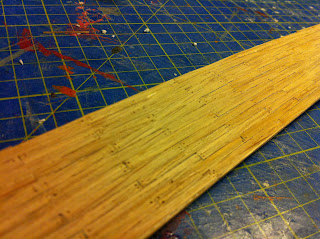
I thought about Wills wooden planking for the platform but I find it just too thick to work, difficult to join seamlessly and, in any case, space means that the platform must be slightly curved.  Instead I have experimented with some cheap oak veneer.  We'll see what it looks like after sanding and painting.


Sunday, October 27, 2013

Parish Church Diorama

"Diorama" is a bit of an exaggeration.  The vicar of the church on which this version is modelled asked to display it for a week.  Of course I was delighted she thought it good enough but decided I ought at least display it in some sort of setting.  So I have rather hurriedly modelled the lychgate and put together this diorama.


I have decided two things in the process.  First, because I am easily distracted, building a diorama gives me a fighting chance of finishing a project. Secondly, I am far from satisfied about the way I have been modelling trees, hedges and grass.  From now on I shall attempt to copy the techniques here http://radnorailways.blogspot.co.uk/


Saturday, August 31, 2013

The Parish Church - final post (well almost)

I've had such a wonderful time building this that now it is done I am quite despondent.  In fact, towards the end of the build I was finding distractions so as not to finish it.  It's been a huge and very, very satisfying challenge.

I haven't got it quite right in parts but I'll know what works and what doesn't for next time - if there is a next time.


I have installed some lighting and will post a few more pics when it's dark - if the lights work and look half decent that is.

I shall now drift aimlessly until I start the next project.  But what will it be?  I've decided I don't like the West Quay station building so I need to find a replacement. The research alone will take a while I expect.  Any suggestions for a branchline country station gratefully received.

Tuesday, August 6, 2013

Church Window Appeal

Work on the church is progressing.  The octagonal steeple proved less difficult than I had anticipated, styrene sheet being remarkably versatile - and thank goodness for squadron putty which covers multiple botching.

I have found that I enjoy adding the detail to a model more than any other stage but it is also the most time consuming.  I don't mind at all.  I'm enjoying it.

However, I need advice.  How do I model the louvre windows in the church tower? I have tried sticking styrene strip straight onto the window backing (painted grey in the photo) but it just isn't working. Any suggestions gratefully received.


Friday, July 19, 2013

Parish Church - Part 2

I read an article in the June edition of BRM where the author had resin cast the barge boards for a station building.  I had wondered how to make the ornamental stonework running along the top of the walls of the church and this looked like a solution (as well as being something new to play with which is a bonus). Making the short section out of styrene strip for the latex mould was very fiddly but the final casting is pleasing.  I have probably saved no time at all - each cast takes 30 minutes to dry - but am very glad I do not have to handcut the rest of the stonework.


Meanwhile, the nave and tower are in progress and some of the buttresses are partly completed.


What an educational, absorbing and fascinating build this is turning out to be.  Always the pessimist, I am gloomily anticipating the day it is finished.    
 

Sunday, July 7, 2013

Parish Church - Part 1

What a challenging project this is turning out to be.  I have no idea how it will turn out but here, anyway, is a report on progress, warts and all.

The kind vicar had allowed me to take pictures and measurements and I found a brilliant android app which allows measurements to be entered onto a photograph. Now that's clever. I think so, but that sort of thing pleases me.


Of course, without incredible rubber man arms and a very long tape measure, estimating the height of the roof, tower and steeple (or anything above about 12/15 feet for that matter) is really hard because of foreshortening (if that's the right word) and the stone blocks being of variable size. In the end I have settled for something that looks about right for the nave walls and roof and will have a go at guessing the heights of the tower and spire once the nave is done.

So, beginning with the nave and after gratefully received comments on a previous post, the sides are of 30 thou styrene sheet.  The stone surrounds for the windows were cut out separately and scored - the window frame is slightly larger than the window aperture.


Onto the walls I added styrene strips at the bottom for the plinth, at the top for the whatever it's called and between the windows where the buttresses are.  (I haven't decided how I will make any of those yet).  The walls have been braced with Evergreen 10mm "I" sections.  That might be excessive but I took a guess that that this would be sufficient to stop the walls warping when the DAS was applied (as I have read can happen) and it seems to have worked.  The DAS was applied with PVA adhesive, rolled using a wallpaper seam roller (an idea I pinched from Iain Robinson), allowed to harden, sanded then scribed.  The stonework isn't quite right when I look back at the photographs of the real thing but I can correct that later.  I'm impatient to get on.  I did wonder whether 30 thou of DAS might be too thin but it seems to have taken fine.  Perhaps I will come down one morning to find it in little heaps.


The end walls followed the same process but with extra styrene sheet where the chancel and tower will attach.

Before sticking the whole lot together, Squadron filler was applied to smooth off the step between the window apertures and the stone surrounds.  I tried Milliput but the quicker drying Squadron filler was more satisfying for an impatient person.


Now, windows.  I don't know what to do.  From the inside, the windows are beautifully detailed 19th century stained glass.  I'm not going to add the protective screens but how best to represent the real thing?  


Monday, July 1, 2013

The Old Workshop - completed

I have been absorbed over the past few days working out how to construct the parish church (I'll make it up as I go along) so have neglected the old workshop. It's now done though. I have very much enjoyed the project - there's something appealing about modelling old and neglected buildings.


I have, at last, been weaned off using proprietary roofing slates thanks to the method Iain Robinson describes in the comment at the end of the post in his blog.  In case this helps someone else, I used 3x3mm squared graph paper from the webprinted on 100 gsm paper, cut into 6x3 rectangles, stuck down with PVA, painted with what I guessed was an overall slatey sort of colour, then picked out individual slates in different shades.  This first attempt is not perfect but much more pleasing - and satisfying.  It makes me think I may have to revisit the roofs of earlier models now though. (I bet I won't.  Too lazy).  The ridge tiles are strips of paper laid over a piece of string glued to the ridge, with thinner strips applied for the joins.  I copied that idea too.  I copy everything.


Here's a nice roofing example too on the lnr models blog.


Tuesday, June 18, 2013

The Parish Church

One of the features I fancied modelling on the new layout is a townscape with a church rising up behind the station.  A bit like Barmouth but on a much smaller scale.  Right at the top and set beneath the cliffs of Barmouth is a very imposing church.  It's surprisingly big considering the size of the town.  Looking around for something more modest I came across this pretty church, St John the Baptist at Pentrobin.


The Vicar very kindly agreed to me taking photographs and measurements.  I've taken a few so as to start thinking about how to model it but will need to return to take a lot more.

I thought about embossed sheets for the stonework but there is nothing suitable on the market so produced a very, very roughly cut and executed sample of three possible alternatives - DAS and scribed styrene, all DAS or all scribed styrene.


I've settled on the left hand one - DAS and scribed styrene.  I would have gone for all DAS but just do not feel confident enough to model the whole church that way.  Cowardly I know but I'm far more confident using styrene strip to model any ornamentation.  Looking forward to this project.

The Old Workshop

In between moving to the new work area (which is bathed in natural light and much more pleasant) I have been tinkering with the Old Workshop I started a few weeks ago.


I still need to join the two buildings with a corrugated roofed shelter, build a staircase and tile the roofs but have started painting.  I noticed some helpful tips on Lee's excellent blog on the use of talc or weathering powders after painting to blend the colours together.  It's not something I've tried before but it does give a much better effect (and the talc smells great).  I fear I may have overdone the dirty windows but a bit of a clean will fix that. 

Sunday, June 16, 2013

Starting Over

A bit quiet of late but I've been moving the "workshop" to a better spec - one with natural light, which is wonderful.

Unfortunately it has meant leaving the original layout behind and starting afresh but I don't mind at all as I never want to actually finish a layout or I'd have nothing to do. Some of the buildings I will relocate from the old layout but others I will happily leave behind and pretend I never built them.

The new layout involves very little planning apart from a round and round bit for the grandchildren to play with.  I will just build around that.

I have concluded that I am incapable of planning too far in advance (although I would love to be able to create something like the wonderful Rails to Llangunllo) but I know what will happen. I'll have something in mind now I want to have a go at but then see another building or something on another blog I want to make instead.  Blog-reading, I have decided, is antithetical to planning!

Sunday, May 19, 2013

The Almshouses....just about done.

After adding chimney pots, ridge tiles, barge boards, gutters, downspouts and finials I'm going to leave the Almshouses alone.  At some point I want to add a couple of hanging baskets but I'm done for now.


My artistic adviser, Mrs Chas, advised that the roof really needed terracotta ridge tiles to finish it off.  She was absolutely right.  She always is. I wondered how to make them but could think of nothing other than bits of styrene strip glued on to the paper tiles with Mek-Pak and topped with styrene rod.  Perhaps there is an easier or better method.  Something more ornamental would be beyond my ability to make but I suppose the serrated edge of a greetings card might work.


I bought this gadget some time ago for cutting lots of small lengths of styrene strip.  It's wonderful.


Related Posts Plugin for WordPress, Blogger...